Daily Cruncher
Lifestyle

Pottery for Beginners: How to Start With Hands in Clay

Pottery is one of the few hobbies you can begin on a kitchen table for the price of a takeout meal. Here is exactly which clay to buy, what tools actually matter, what firing costs, and the beginner mistakes that crack pots before they ever reach a kiln.

Najam Kausar
By Najam Kausar
Updated 13 min read
Hands in Clay: A Beginner’s Guide to pottery for beginners!

TL;DR: Start with two pounds of clay, a wooden rib, a wire cutter, and a sponge on a covered table. Learn pinch, coil, and slab building before touching a wheel. Air-dry clay is decorative only; anything you plan to drink from must be a fired, food-safe-glazed clay body. Most beginner failures are drying failures, not skill failures.

Pottery is the craft of shaping clay — a plastic mixture of weathered rock, minerals, and water — into objects that are made permanently hard by heat. It is one of the oldest human technologies and one of the very few creative hobbies you can genuinely begin at a kitchen table for the price of a takeout dinner. This guide covers what to buy, what to skip, what things cost, and the specific mistakes that ruin first pots.

What do you actually need to start pottery at home?

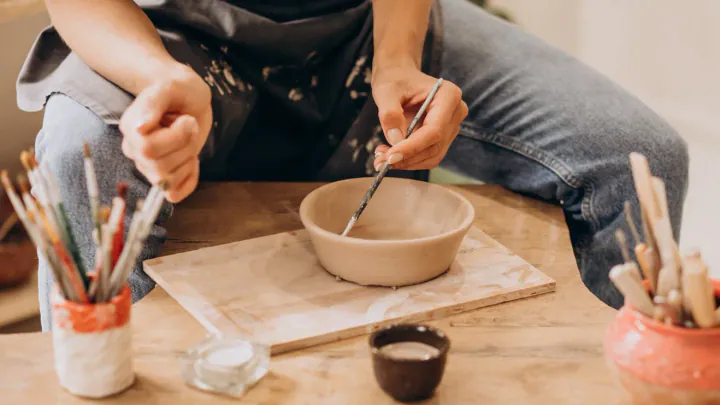
You need clay, a wire cutter, one wooden rib or modeling tool, a sponge, and a non-porous work surface. Everything else in a beginner tool kit is convenience. Our team has watched people spend more on a 20-piece sculpting set than on the clay itself and then use exactly three of the tools.

  • Clay — two to five pounds is plenty for your first three or four pieces.
  • Wire cutter — a length of wire with two toggles; slices blocks cleanly and lifts work off the wheel.
  • Wooden rib and a metal rib — for smoothing curves and compressing surfaces.
  • Needle tool — for scoring joins and trimming uneven rims.
  • Sponge — a natural elephant-ear sponge is worth the small upgrade.
  • Surface — canvas, a plaster bat, or a sealed board. Avoid bare wood, which sticks, and avoid the dining table your household loves.

Set up somewhere you can leave things out. A hobby that requires fifteen minutes of setup gets abandoned; if you have already trimmed your screen habits with a deliberate digital declutter, a permanent clay corner is what fills the gap.

Which clay should a beginner buy — air-dry, earthenware, or stoneware?

If you have no kiln access, buy air-dry clay and accept that your work is decorative. If you have studio or kiln access, buy a smooth white or buff stoneware with fine grog — it is the most forgiving clay body for beginners and fires into genuinely durable, watertight ware.

Grog is pre-fired clay ground back into the mix. It opens the clay body, lets water escape evenly, and dramatically reduces drying cracks. A beginner clay with fine grog behaves better in inexperienced hands than a silky, grog-free porcelain, which punishes every hesitation.

Beginner clay types compared
Clay typeNeeds a kiln?Typical firing rangeBest forWatch out for
Air-dry clayNoNone — dries at room temperatureTrinket dishes, ornaments, sculpture, kids' projectsNever waterproof or food-safe; softens if soaked
Polymer clayNo (home oven)About 265–275°F in a domestic ovenJewelry, beads, tiny figuresIt is a plastic, not a ceramic — different craft entirely
EarthenwareYesLow fire, around cone 06–04Bright colored glazes, terracotta plantersStays slightly porous; chips more easily
Mid-range stonewareYesCone 5–6, roughly 2160–2230°FMugs, bowls, plates, everyday tablewareNeeds a studio or a kiln of your own
PorcelainYesCone 6–10Fine translucent work, later projectsSlumps, warps, and cracks under beginner handling

How much does it cost to start pottery?

A kitchen-table air-dry setup runs to roughly the cost of a nice dinner out. A community studio course is a few hundred dollars for eight weeks and usually bundles clay, glazes, and firing. A full home studio with a wheel and kiln is a four-figure commitment before you throw a single pot.

Three routes into pottery and what each realistically requires
RouteRough outlaySpace neededWho it suits
Air-dry clay at homeCost of clay plus a handful of toolsA table cornerTesting whether you like clay at all
Community studio class or membershipA few hundred dollars per course; monthly memberships commonly in the low hundredsNone at homeAlmost every beginner who wants fired, usable work
Home studio with wheel and kilnFour figures, plus electrical work and ventilationGarage, basement, or outbuildingPeople already two or more years into the craft

The hidden cost is electrical. Most kilns capable of mid-range stoneware need a dedicated 240-volt circuit and a vent, which means an electrician, not an extension cord. Budget for that before the kiln, not after. If you are planning the spend across a year, a small sinking fund for hobby equipment is a calmer approach than a sudden purchase — and none of this is financial advice, just household arithmetic.

What hand-building techniques should you learn first?

Learn pinch pots, then coils, then slabs — in that order. Each one teaches a skill the next depends on, and all three can be done with your hands and a single wooden tool.

  1. Pinch pot. Roll a ball, press a thumb into the center, and rotate while squeezing the wall between thumb and fingers. Aim for even walls about a quarter inch thick. This teaches you what consistent thickness feels like, which is the foundation of everything else.
  2. Coil building. Roll ropes of clay, stack them, and blend the seams inside and out. Coils let you build tall forms with no wheel and no size limit.
  3. Slab construction. Roll flat sheets to even thickness, let them stiffen to leather-hard, then cut and join them into boxes, vases, and faceted mugs. Leather-hard is the key: floppy slabs will not hold an edge.

Join every seam with score and slip. Scratch a crosshatch into both mating surfaces, brush on slip (clay thinned with water to yogurt consistency), press together, and blend. An unscored join looks fine while wet and separates cleanly in the kiln. Also join clay at matching moisture levels — sticking a wet handle onto a leather-hard mug is the single most common cause of handles popping off during drying.

How hard is the pottery wheel, really?

Harder than it looks and easier to enjoy than it looks. Expect several sessions before you center clay reliably, and expect your first genuinely usable cylinder somewhere around hour five to ten of practice. This is normal, not a sign of a lack of talent.

Three rules save beginners the most frustration:

  • Center with your body, not your arms. Lock your elbows against your thighs and lean. Arm muscles shake; braced bones do not.
  • Keep the clay wet but not soupy. Over-watering saturates the walls and causes collapse. Sponge out excess water from the bottom of every form.
  • Compress the floor. Press the inside base firmly with a rib before pulling walls. Skipping this is why wheel-thrown bowls develop the classic S-shaped crack across the bottom, which appears weeks later in the bisque firing.

A wheel is optional. Plenty of working potters hand-build exclusively, and hand-building is better suited to small apartments because it makes far less mess.

Why do beginner pots crack, warp, or explode?

Moisture and uneven thickness cause nearly every failure. Thin rims dry faster than thick bases, the shrinking parts pull against the parts that have not shrunk yet, and the clay tears along the stress line. The fix is slow, even drying — not a stronger clay.

Dry finished work loosely tented in plastic for two to three days, then uncovered for another week or so until the piece feels room temperature rather than cool to the cheek. Cool means water is still evaporating. Never dry near a heater, in a sunny window, or in front of a fan.

One myth worth correcting: air bubbles are not the main reason pots explode in a kiln. Trapped water is. Residual moisture flashes to steam, expands violently, and blows the piece apart. Potters wedge clay to remove air because bubbles distort forms and fight you on the wheel, but bone-dry clay is the real protection against kiln accidents.

Another one beginners rarely hear: clay shrinks roughly 10 to 13 percent from wet to fired. If you want a 12-ounce mug, build a mug that holds noticeably more than 12 ounces wet. Lids, coasters, and anything that must fit an existing object need the same allowance.

How do you decorate and finish a piece?

Decorate at the leather-hard stage for texture and carving, and after bisque firing for glaze. Damp clay smears; bone-dry clay crumbles and releases silica dust when carved, so work leather-hard and wear a mask if you sand.

  • Texture: press leaves, lace, rope, or carved stamps into leather-hard clay.
  • Color under glaze: underglazes behave like paint and keep their color through firing.
  • Carving: a loop tool or a sharpened wooden skewer at leather-hard, not a toothpick on wet clay.
  • Air-dry pieces: acrylic paint plus a water-based sealer. Decorative use only.

For fired work, the sequence is bisque firing (typically cone 06–04, roughly 1830–1950°F) to make the piece hard and porous, then glazing, then a glaze firing to the clay body's maturing temperature. Wipe every trace of glaze off the foot of a pot before it goes in — glaze fuses to kiln shelves and studio managers charge for the damage.

Is handmade pottery food-safe?

Only when three conditions are all met: a vitrifying clay body, fired to its correct temperature, and coated with a commercial glaze explicitly labeled food-safe and applied per its instructions. Miss any one and the piece is decorative.

This is where beginners are most often misled. Air-dry clay sealed with craft varnish is not food-safe, not dishwasher-safe, and not waterproof in any meaningful sense — hot liquid and detergent will break the seal. Likewise, layering random glazes can cause crazing and leaching even when each glaze alone is food-safe. Test with a test tile first. If you plan to sell tableware, check your local requirements on ceramics that contact food.

Should you take a class or teach yourself?

Take a class if you want fired, usable pots; teach yourself if you want to find out whether clay suits you at all. The decision rule is simple: if your goal is a mug you can drink from, you need kiln access, and a class is the cheapest route to it.

Studios also solve the problems videos cannot — a teacher can see that your hands are too far apart in three seconds. They supply clay reclaim, glaze buckets, wedging tables, and the company of people at the same skill level.

This does not apply if you are working in polymer clay, which bakes in a home oven and belongs to the jewelry-making world rather than ceramics. The techniques do not transfer.

What should you make first?

Make three pinch pots, a coil vase, and a slab tray before you attempt a mug with a handle. Small, low, open forms dry evenly and forgive mistakes; tall thin forms and attached handles do not.

Good early projects that people actually use:

  • A ring dish or key tray — the perfect starter object, and genuinely useful in the first three feet of an entryway.
  • A small planter with a drainage hole, punched while leather-hard.
  • Chunky candle holders, which reward thick walls rather than punishing them.
  • A spoon rest or soap dish — a slab and two pinched edges.

Photograph every piece. Three months of progress photos will show improvement your memory refuses to credit you with.

Does pottery actually help with stress?

Many people find repetitive handwork calming, and clay in particular demands the kind of slow, two-handed attention that leaves no room for a phone. We would not overstate it — pottery is a hobby, not a treatment, and anyone managing a diagnosed condition should speak with a qualified professional rather than rely on a craft.

What we can say plainly is that pottery has a built-in pace. Clay cannot be rushed; it dries when it dries and fires when the kiln is full. Paired with a calm, deliberate morning routine, a weekly studio session gives the week a fixed, screen-free anchor — and that structure is often what people are really after.

Key takeaways

  • Buy clay, a wire cutter, a rib, and a sponge. Skip the 20-piece tool set until you know which three tools you reach for.
  • Air-dry clay is for decoration; anything you eat or drink from must be a fired clay body with a food-safe glaze.
  • Even wall thickness and slow, tented drying prevent the majority of beginner cracks — thickness is a skill, not an accident.
  • Score and slip every join, and only join clay at matching moisture levels.
  • Build about a tenth larger than your target size, because clay shrinks roughly 10 to 13 percent from wet to fired.
  • If your goal is usable pottery, a community studio course is the cheapest, fastest path to kiln access.

Frequently asked questions

Can you do pottery at home without a kiln?

Yes — air-dry clay hardens at room temperature and needs no kiln, and many community studios will fire pieces made at home for a per-piece or per-shelf fee. The trade-off is that unfired air-dry work is decorative only: it is not waterproof, not food-safe, and will soften if soaked.

What is the best clay for a complete beginner?

A smooth, grogged white stoneware is the best all-around beginner clay if you have kiln access, because it is forgiving to shape, dries with fewer cracks, and fires durable. If you have no kiln, start with air-dry clay for decorative pieces and move to stoneware once you join a studio.

How long does clay take to dry and fire?

Air-dry clay usually takes 24 to 72 hours to harden depending on thickness and humidity, while kiln work must dry to bone-dry over roughly one to two weeks, then go through a bisque firing and a glaze firing. From wet clay to finished glazed mug, three to four weeks is normal in a shared studio.

Why did my pot crack while drying?

Almost always because it dried unevenly — thin rims and handles lost water faster than thick bases and pulled apart. Cover work loosely with plastic for the first few days, keep wall thickness even at about a quarter inch, and never dry pieces on a heater or in direct sun.

Is handmade pottery safe to eat and drink from?

Only if it is made from a vitrifying clay body, fired to the correct temperature, and glazed with a commercial glaze labeled food-safe and applied per its instructions. Air-dry clay sealed with craft varnish is never food-safe, no matter how glossy it looks.

How much does a beginner pottery class cost?

In most US cities an eight-week beginner wheel course typically runs a few hundred dollars and usually includes clay, glazes, firing, and open studio time. Monthly memberships for people who already know the basics are commonly in the low hundreds, and a single-day workshop is often under a hundred dollars.

Do air bubbles in clay make pots explode in the kiln?

Trapped moisture is the real culprit, not air itself — water inside a not-quite-dry pot flashes to steam and blows the piece apart. Air pockets can distort a form and cause problems on the wheel, which is why potters wedge clay, but a bone-dry pot is the single best insurance against a kiln accident.

How much does clay shrink?

Most clay bodies shrink roughly 10 to 13 percent from wet to fully fired, combining drying and firing shrinkage. Build mugs, lids, and anything that has to fit something else about a tenth larger than the finished size you want.

Discover more

Related reads