Why Your Toilet Keeps Running and How to Stop It
A running toilet is nearly always the flapper, the fill valve, or the chain and float. Test in the right order, find the real fault, and buy only the part you need.
Drafted with AI. This version has not been reviewed by an editor, so it carries no ads — how we work.
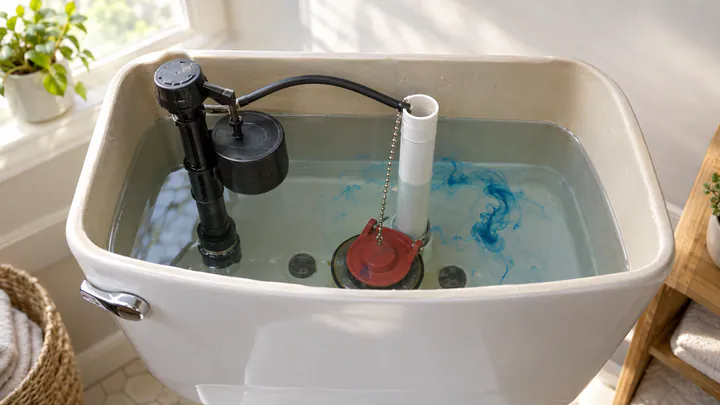
A toilet that keeps running almost always has one of three faults: a flapper that no longer seals, a fill valve that won't shut off, or a chain or float that keeps either part from doing its job. The fix is cheap, but only if you replace the right part. This guide puts the tests in order so you can find the actual fault in a few minutes, then make the repair in an afternoon, whether you own the place or rent it.
It covers water moving inside the tank and into the bowl. If you see water on the floor around the base, or dripping from between the tank and the bowl, that is a different repair involving the wax ring or the tank bolts, and nothing here will fix it.
Before you touch anything inside the tank
Lift the tank lid and set it somewhere flat and padded, like a folded towel on the floor. Lids are heavy and crack easily if they slide off a counter. You can look and listen with the water on, and the first two tests below need it on.
Once you start adjusting or removing parts, shut off the water first. Turn the supply valve on the wall behind the toilet clockwise until it stops, then flush and hold the handle down so the tank empties as far as it will go. A sponge and a small bucket get the last inch or so out. If the shutoff valve is stiff, don't force it with pliers; old valves can snap or start leaking at the stem. Shut off the water to the house instead and have the valve looked at later.
Useful to have on hand: a towel, a sponge, a bucket, adjustable pliers, a flat screwdriver, food coloring, a tape measure or ruler, and your phone to photograph parts before you remove them.
Listen and look: three symptoms, three parts
How the toilet runs tells you where to start. Match what you hear to the table, then go straight to that test.
| What happens | Most likely cause | Test first |
|---|---|---|
| Constant hiss or trickle; water spilling into the top of the overflow tube | Water level set too high, or a fill valve that won't shut off | Check the water level against the overflow tube |
| Tank refills on its own every few minutes or hours (often called a phantom flush) | Flapper leaking into the bowl | Dye test |
| Runs after a flush until you jiggle the handle | Chain too short, tangled or catching; sticking handle; flapper not dropping | Watch the flapper close and check chain slack |
If the symptom is unclear, check in this order: water level first because it takes ten seconds, then the dye test, then the chain. That sequence catches most faults without buying anything.
The dye test for a leaking flapper
The flapper is the rubber seal at the bottom of the tank that lifts when you flush and drops to hold water in. As it ages, it stiffens, warps or picks up mineral deposits, and water seeps past it into the bowl. The tank level falls slowly until the fill valve kicks in and tops it up, which is the phantom flush.
- With the water on and the tank full, add a few drops of food coloring to the tank water. Dark blue or green shows up best.
- Don't flush. Wait about 15 to 30 minutes.
- Look in the bowl. Any tint of color means water is getting past the flapper.
- Flush afterward to clear the dye.
If color appears, try the quick checks first: make sure the chain isn't holding the flapper slightly open (next section), and run a finger around the underside of the flapper for grit or slime. If the rubber feels hard, cracked or misshapen, replace it. If the bowl stays clear, the flapper is sealing and the problem lies with the water level or fill valve.
One exception: a refill tube pushed down inside the overflow tube can siphon tank water into the bowl continuously and mimic a flapper leak. Check that before you buy a flapper (see the water level section below).
Chain length and a sticking handle
The chain links the flush handle's lever arm to the flapper. Too short and it holds the flapper partly open; too long and the slack can get trapped under the flapper as it drops, keeping it from sealing.
With the flapper closed, the chain should have about 1/2 in (1 cm) of slack. Unclip the chain from the lever arm and move the clip one or two links at a time until you get there. Trim excess chain so a loose tail can't fall under the flapper, leaving a few spare links in case you need to adjust later.
Then flush and watch. The flapper should rise, stay up briefly, and drop squarely onto its seat. If it lands off-center, the chain may be attached at the wrong point on the lever arm; move it to the hole that sits most directly above the flapper.
If the handle itself stays down after a flush, the problem is the handle mechanism. Check the large nut that holds the handle to the tank, inside the tank behind the handle. On most toilets it is reverse-threaded, so you tighten it counterclockwise. A loose nut lets the handle wobble and bind; one that is overtightened can make it stiff. If the lever arm is corroded or the handle still sticks, a replacement handle costs roughly $5 to $15 and swaps out with the same nut.
Water level, the overflow tube and the float
The overflow tube is the open vertical pipe in the middle of the tank, usually beside the fill valve. It exists to stop the tank from flooding if the fill valve fails, so if the water level sits at or above its top, water drains into the bowl constantly and the fill valve never shuts off.
The water should stop about 1 in (2.5 cm) below the top of the overflow tube, or at the fill line if your tank has one marked on its inside wall. If it is higher, lower the float:
- Float cup on the fill valve shaft (most modern toilets): turn the adjustment screw on top of the valve, or squeeze the clip on the metal rod and slide the cup down. Lower it about 1/4 in at a time, flush, and check where the water stops.
- Float ball on a horizontal arm (older ballcock valves): turn the adjustment screw where the arm meets the valve, or gently bend a brass arm downward. Check that the ball isn't waterlogged; if it feels heavy or has water inside when you shake it, replace it.
- Float that catches: make sure the float moves freely and isn't rubbing the tank wall or snagging the flapper chain.
Now check the refill tube, the thin flexible tube running from the fill valve to the overflow tube. It sends a little water into the bowl after each flush. It should be clipped to the top of the overflow tube so its end sits above the opening, not pushed down inside it. If it hangs below the water line inside the tube, it can siphon water out of the tank and keep the toilet cycling.
Adjusting or replacing the fill valve
To test the fill valve, lift the float gently by hand while the tank is filling. If the water stops cleanly, the valve works and you only need to adjust the level. If water keeps hissing in with the float held up, the valve isn't sealing.
Debris is a common cause. On many float-cup valves you can shut off the water, remove the cap on top, and briefly turn the water back on while holding an upturned cup over the open valve to flush grit out of the supply line. Check the rubber seal inside the cap for wear while you are there. Replacement seals exist for some models, but they are not always easy to match.
When replacing beats adjusting
We'd replace the fill valve rather than keep fiddling with it if any of these apply:
- It still hisses or trickles after you have lowered the level and cleaned it.
- It is an old ballcock with a float ball, or its plastic is brittle and the adjustment screw is stripped.
- It shuts off slowly, takes a long time to refill, or makes a loud whine or vibration.
- You have already adjusted it more than once in recent months for the same problem.
A universal fill valve costs roughly $10 to $25 and fits most two-piece toilets. The swap itself takes about 30 to 45 minutes:
- Shut off the water, flush, and sponge the tank dry.
- Put a towel under the tank and unscrew the supply line from the bottom of the fill valve. Expect a little water.
- Unscrew the large locknut on the underside of the tank and lift the old valve out.
- Set the new valve's height according to its instructions. Many have a mark on the body that must sit a specified distance above the top of the overflow tube, commonly at least 1 in.
- Seat the valve with its gasket inside the tank, tighten the locknut hand-tight plus about a quarter turn, and reconnect the supply line. Overtightening can crack porcelain.
- Clip the new refill tube above the overflow tube, turn the water on slowly, check for drips under the tank, and set the water level.
If the supply line is old, braided or rigid and corroded, replacing it at the same time costs a few dollars and saves a second trip.
Swapping a flapper: matching size and type
Flappers come mainly in 2 in and 3 in sizes, and the size refers to the flush valve opening, not the flapper itself. Before buying, measure the drain hole at the bottom of the tank across its inside. Many newer toilets use the 3 in size; a 2 in flapper on a 3 in opening will leak no matter how well you adjust it.
Check how the old one mounts, too:
- Ear-mounted: two rubber ears hook onto pegs on either side of the overflow tube.
- Ring-mounted: a ring slides down over the overflow tube. If your toilet has pegs, you can usually cut the ring off a universal flapper and use the ears.
- Adjustable: some low-flow toilets need a flapper with a dial or float that controls how long it stays open, so the flush volume stays correct.
- No flapper at all: some toilets use a tall canister or tower-style flush valve with a ring-shaped seal at the base. Those need the manufacturer's seal, not a flapper.
The easiest way to get it right is to take the old flapper and a photo of the tank interior to the store. A standard flapper costs roughly $5 to $15. To fit it, shut off the water, flush, unhook the old one from its pegs and the chain, hook the new one on, reset the chain to about 1/2 in of slack, and run the dye test again.
If a new flapper wears out quickly, look at what is in the tank. In-tank bleach or cleaning tablets can make rubber parts break down sooner; using bowl cleaner in the bowl instead keeps them out of the tank.
When the problem is the flush valve seat
If a new, correctly sized flapper still fails the dye test, the fault is probably the seat it rests on: the rim of the flush valve opening. Shut off the water, drain the tank, and run a fingertip around the rim. It should feel smooth and even. Pitting, grooves, a crack or a crust of mineral deposits will let water past any flapper.
For light deposits, scrub the rim gently with a nonmetallic scouring pad or fine wet sandpaper until it is smooth, wipe it clean, and test again. For a pitted or damaged seat, a seat repair kit bonds a new rim over the old one with adhesive and comes with a matching flapper; it usually needs a few hours to cure before you refill the tank.
A cracked flush valve has to be replaced, and that means taking the tank off the bowl and replacing the tank-to-bowl gasket and bolts as well. That is a bigger job than anything above. Renters should hand it to the landlord, and homeowners who aren't comfortable lifting off a full porcelain tank may prefer to call a plumber or weigh it against the cost of a new toilet.