Practical Ways to Organize a Cluttered Pantry That Stay Fixed
Most pantry makeovers collapse within a month because they were styled, not designed. Here is a practical reset: what to decant and what to leave in its packaging, how to tame deep shelves, how to rotate stock, and a 10-minute weekly habit that makes it stick.
Rewritten with AI and republished automatically. Our editors set the standards and fix reported errors — how we work.
TL;DR: A pantry stays organized when every item has one obvious home and nothing hides. Measure your shelves, decant only fast-moving dry goods, zone by how you cook, fix deep shelves with turntables and pull-out bins, rotate oldest to the front, and spend ten minutes a week resetting. Tools help; the habit is what lasts.
Why does a pantry get cluttered again a month after I organize it?
Because most makeovers are styled rather than designed. Matching jars photograph beautifully, but if the rice lives where you reach for cereal, or the back row of a 20-inch shelf is invisible, the system fights your routine and your routine wins.
Pantry organization is a storage system that groups food by how it is used, keeps every item visible, and rotates stock so nothing expires unseen. Three things break it: shelves deeper than your arm is patient, categories that do not match how you actually cook, and no fixed place to put groceries down on unpacking day.
The rule is simple: if putting something away takes more than three seconds of thought, the system will fail. Everything below is aimed at shortening that decision.
How do I reset a cluttered pantry in about 90 minutes?
Work in one session, in this order, and do not shop mid-project. A standard closet pantry resets in 90 minutes to two hours.
- Measure first, days before. Write down shelf width, depth, and the vertical gap between shelves. Most bins that "don't fit" fail on height, not width.
- Empty one shelf at a time onto the counter or table. Doing the whole pantry at once creates a floor of chaos you will rush to clear.
- Wipe the shelf and check for crumbs, spills and any sticky rings under oil bottles.
- Sort into four piles: keep, donate (unopened, unexpired, genuinely in date), compost or discard, and relocate — the vase, the batteries, the lunchboxes.
- Group the keep pile into categories on the table before anything goes back. You will discover you own four half-bags of brown sugar.
- Place, then label. Heavy and bulk low, daily items at eye level, rare and seasonal up high.
One honest caveat: if your pantry is a set of open shelves in a humid kitchen rather than a closed closet, prioritize airtight lids over pretty bins. Humidity, not clutter, is your main enemy there.
Which pantry containers are actually worth buying?
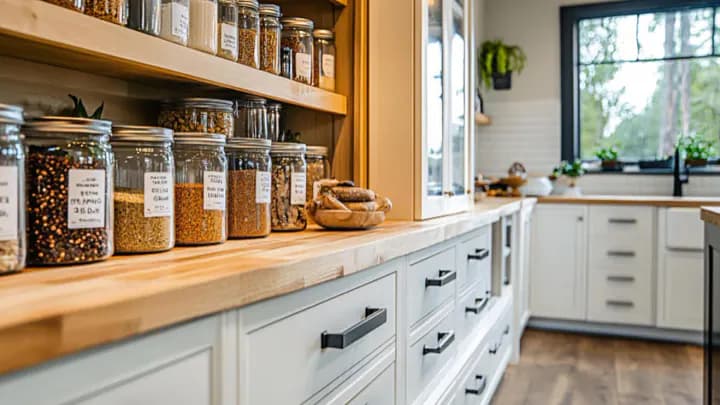
Buy containers for the eight to twelve items you touch weekly, and leave the rest in labeled bins. A full matched set looks impressive and ties up money in jars of lentils you open twice a year.
| Type | Best for | Strengths | Watch out for |
|---|---|---|---|
| Glass jars with gasket lids | Flour, sugar, pasta, coffee, grains | Airtight, no odor retention, dishwasher safe, visible | Heavy on high shelves; breakable; opaque contents still need a label |
| Rectangular BPA-free plastic | Cereal, oats, snack mixes, bulk rice | Square footprint wastes no shelf space; light enough for kids | Can stain and scratch; check the lid seals with a real gasket, not just a snap |
| Open bins or baskets | Packets, chips, kids' snacks, baking odds and ends | Cheapest, fastest to put away, pulls out like a drawer | Not airtight; label the bin, not the contents, or it becomes a junk drawer |
| Original packaging | Rarely used items, anything with a recall lot code or cooking directions | Free; keeps expiry date, allergen info and instructions attached | Flimsy bags tip over — stand them upright inside a bin |
Whatever you choose, put the date on the container, not just the name. A small strip of painter's tape with "AP flour · Mar" answers the one question a clear jar cannot.
What should I never decant into a container?
Four categories are worth leaving alone, and this is where most guides go quiet.
- Anything you might need to check in a recall. Lot codes live on the package. Flour and nut products are recalled more often than people expect, and a decanted jar gives you nothing to match against.
- Whole-grain flours, wheat germ, nut flours and shelled nuts. The oils in them go rancid at room temperature far faster than in white flour. These belong in the refrigerator or freezer in a sealed bag, not a display jar.
- Brown sugar. It needs a little moisture to stay soft. A truly airtight jar with a terracotta disc works; a loose bin does not.
- Mixes with instructions printed on the box — pancake mix, boxed rice, gelatin. Cut the panel out and tape it inside the lid if you decant anyway.
One more prevention step: freeze newly purchased flour, cornmeal and rice for about 72 hours before shelving. Pantry moth and weevil eggs typically arrive inside the bag from the mill, so airtight containers contain an infestation rather than prevent one — which is still a very good reason to use them.
How should I zone the shelves for the way I actually cook?
Zone by occasion rather than by food group. "Breakfast" beats "grains" because at 7 a.m. you reach for one shelf, not three.
- Eye level: breakfast, coffee and tea, everyday snacks — the things opened daily.
- Waist to chest: dinner building blocks — pasta, rice, canned tomatoes, broth, oils and vinegars. If one-pot pasta dinners are a weeknight default for you, this shelf should hold everything that recipe needs in one reach.
- Low shelf or floor: heavy bulk bags, bottled water, appliances, pet food.
- Top shelf: holiday baking, party platters, backup paper goods. Keep a small step stool nearby or this becomes a graveyard.
- A designated kid bin at their shoulder height, labeled and restocked weekly, ends the daily rummage that undoes everything else.
Add a narrow "eat me first" basket at eye level for anything nearing its date. It is the single highest-return square foot in the pantry, and it quietly feeds your sheet-pan dinner rotation.
How do I fix deep shelves and a wasted pantry door?
Treat any shelf deeper than roughly 14 inches as a front zone and a back zone, and give the back zone a way to come forward. That is the whole principle.
- Turntables for bottles and jars — oils, vinegars, sauces, nut butters. Choose a diameter at least two inches narrower than the shelf depth so it spins without catching.
- Tiered risers for cans, so the rear rows are readable at a glance.
- Pull-out bins with a front handle for packets, baking supplies and snacks. The handle is not decoration; without it people stop pulling.
- Corner shelves in an L-shaped pantry need a turntable or they will hold the same jar for six years.
The door is genuinely free storage, with two conditions most buyers miss: check that the rack clears the shelf edges when the door closes, and respect the weight limit on a hollow-core door. Spice jars, packets, tea, foil and wrap boxes, and vitamins are ideal. Canned goods are not. The same "make the first three feet work" logic we apply to entryway design applies here — the transition zone does the heaviest lifting.
How do I rotate stock so nothing expires in the back?
Use first-in, first-out: new groceries go behind or under what is already there, every single time. The moment to enforce it is unpacking day, not cleaning day.
A worked example. You buy three cans of chickpeas but two are already on the shelf. Pull the old two forward, set the new three behind them, and you are done in four seconds. Skip that, and eighteen months later you find a bulging can behind a cereal box. The habit costs less time than the cleanup.
Also worth knowing: "best by" and "sell by" are quality dates, not safety cliffs, for most shelf-stable foods. Dried pasta, canned goods and rice are usually fine past them if the packaging is intact and undamaged; infant formula is the notable exception where the date is meaningful. When a can is bulging, leaking, deeply dented at the seam, or a package smells off, discard it rather than testing your luck, and check current food safety guidance from a qualified source if you are unsure.
What does a pantry overhaul cost, and where should the money go?
Spend on the tools that solve access problems, not on matching aesthetics. Approximate 2026 ranges for a standard closet pantry:
| Tier | Rough spend | What you get | Best for |
|---|---|---|---|
| No-buy reset | $0-40 | Reused jars, cardboard dividers, painter's-tape labels, one turntable | Testing zones before committing to bins |
| Functional fix | $60-120 | Two turntables, a can riser, 3-4 pull-out bins, a door rack | Deep shelves and a lost back row — the highest-return tier |
| Full system | $200-400 | Matched airtight containers, label maker, shelf risers, drawer inserts | Heavy home cooks who buy in bulk weekly |
Our advice is to live with the no-buy reset for two weeks first. You will find that one or two zones are wrong, and you will have spent nothing discovering it.
What are the most common and costliest pantry mistakes?
- Buying bins before measuring shelf height. The most frequent and most expensive error. Measure the vertical gap, not just the footprint.
- Topping up old flour with new. It resets nothing and ages the whole container. Empty, wipe, refill, re-date.
- Labeling the item instead of the zone. Items change; zones should not. "Baking" on the bin outlasts "powdered sugar" on the jar.
- Storing bulk bags on the floor of a garage pantry. Temperature swings and pests both start at floor level.
- Organizing around aspiration. If you have not made bread in two years, the bread flour zone is costing you eye-level space that your actual weekday breakfasts should own.
How do I keep the pantry organized after the novelty wears off?
Attach maintenance to something you already do. Ten minutes before the weekly grocery run: face the labels forward, pull expiring items into the "eat me first" basket, and photograph the shelves with your phone so you shop from evidence instead of memory.
Then hold a seasonal reset four times a year — a proper 20-minute pass to purge, wipe and re-zone. The same editing instinct behind a capsule wardrobe works on food storage: fewer, better-placed items beat more options you cannot see.
And give yourself one permitted mess. A single "landing basket" for the items nobody knows where to put keeps the rest of the system honest. Empty it weekly, and the chaos stays contained to one square foot.
Key takeaways
- Measure shelf height and depth before buying a single container — height is what fails.
- Decant only the eight to twelve dry goods you use weekly; leave recall codes, whole-grain flours and cooking instructions in their original packaging.
- Any shelf deeper than about 14 inches needs a turntable, a riser or a handled pull-out bin, or the back row is lost.
- Zone by occasion — breakfast, dinner, baking, snacks — not by food group, and give kids a labeled bin at their height.
- First-in, first-out happens at unpacking, not at cleaning; date every container you refill.
- Ten minutes a week plus four seasonal resets beats any amount of matching glassware.
Frequently asked questions
Should I decant everything into matching containers?
No — decant only the dry goods you use at least weekly and that come in packaging that does not reseal, such as flour, sugar, rice, pasta, oats and cereal. Rarely used items, anything with cooking instructions printed on the bag, and products you might need to check against a recall are safer left in their original packaging inside a labeled bin.
How do I stop pantry moths and weevils?
Freeze newly bought flour, cornmeal, rice and birdseed-style grains for about 72 hours before shelving them, then store them in airtight containers. Insect eggs usually arrive inside the package from the mill, so airtight containers alone do not prevent an infestation — they contain it, which is exactly why one bad bag does not spread to the whole shelf.
What is the best way to organize deep pantry shelves?
Treat anything deeper than about 14 inches as two zones and give the back a way to come forward: turntables for bottles and jars, pull-out bins with a front handle for packets and snacks, and tiered risers for cans so the back row is visible. Never store two unrelated categories front-to-back, because the rear one disappears.
How long does it take to organize a pantry?
A single-closet pantry takes roughly 90 minutes to two hours if you work in stages: empty and wipe, sort into keep, donate and discard, group into categories, then place. The measuring-and-shopping step should happen before that session, not during it, or you will lose an entire day.
What does it cost to organize a pantry?
A functional reset runs roughly $0-40 if you reuse jars and cut cardboard drawer dividers, about $60-120 for turntables, can risers and a few bins, and $200-400 for a full matched set of airtight containers with a label maker. The storage tools that solve real problems — turntables, risers, pull-out bins — are the cheapest part.
Do clear containers actually reduce food waste?
They help, but only in combination with rotation. Visibility tells you what you have; a first-in, first-out habit tells you what to use next. Households that decant without dating their containers often top up new flour on top of old, which quietly ages the whole batch.
Where should I put items my kids need?
Give children a labeled low bin at or below their shoulder height with approved snacks, and keep the rest of the shelf above it. Self-service at a known height is what stops the daily rummage that undoes your zones.